Tuesday, 26 February 2013

Windows Password Unlocker

Windows Password Unlocker Standard enables you to reset local administrator and other user passwords on Windows 7/Vista/XP/2000 with a CD/DVD. Now, you can follow the user guide step-by-step to reset the forgotten Windows password.

Requirements:
1. A blank CD/DVD and CD-ROM±RW drive or a USB flash drive are required
2. Download and install this software in a Windows PC that you can run as administrator and has burning function.
3. Do not download it to a Mac.
1Download Windows Password Unlocker Standard
    Note:
  • 1. Download this software on another computer that you can run as administrator, because you forgot the administrator password to your locked computer.
  • 2. Windows Password Unlocker doesn't support Mac, so please download and install it in a Windows computer
2Burn a password reset disk with a bootable CD/DVD
1. Insert a blank or erasable CD/DVD in the computer, and then run Windows Password Unlocker Standard.
2. Select target device and click the Burn CD/DVD button to create a password reset CD/DVD.
3. Click OK when the burning task completes. Now you have successfully created a password reset CD/DVD and take it out
Burn a Windows Password Reset CD/DVD
3Reset Windows password with created CD/DVD reset disk
Insert the bootable password reset CD/DVD in the computer that you want to reset password of, and then set BIOS of the computer to boot from the CD/DVD. Learn how to boot from CD/DVD.
After BIOS settings, the interface of Windows Password Unlocker Standard comes up. You’ll see the lists of all the Windows accounts with user names which show as "Protected" or "Blank".
Protected means that this account is password protected.
Blank means that this account is not password protected.
1. Select the user name of your target account, and then click Reset button.
reset button
2. Click Yes to confirm and continue your operation.
Continue to reset Windows password
3. Click OK when the password is successfully reset.
Reset Windows password
4. Your password is blank now. You can click Reset to recover another user password or click reboot to restart your PC.
Complete the Windows password recovery
5. If you click Reboot, the following window comes up. Click Yes and remove the CD/DVD from your computer.
Restart Windows PC
Now the computer restarts to Windows logon screen, you can select the password reset account and regain access without a password.

How to Change MAC Address

First open run dialog box and type ncpa.cpl
1 How to Change MAC Address
Select appropriate network connections adapter and click on Properties
2 How to Change MAC Address
Click Configure button to go through the next step.
2.1 How to Change MAC Address
Under “Advanced” tab you should see an item called “Network Address” click on it. (See figure below as an example)
On the right side, under “Value”, type in the New MAC address you want to assign to your NIC. 
3 How to Change MAC Address
To verify the MAC ID, simply go to command prompt and enter the command ipconfig /all.

Win7 MAC Address Changer

Win7 MAC Address changer is a freeware windows program which can change the MAC (Media Access Control) Address of many wired and wireless network adapters. Win7 MAC Address Changer is capable of spoofing MAC Address in all major windows systems including Windows XPWindows Vista and Windows 7 (both 32bitand 64bit systems).
mac+address+changer How to Change MAC Address
Download

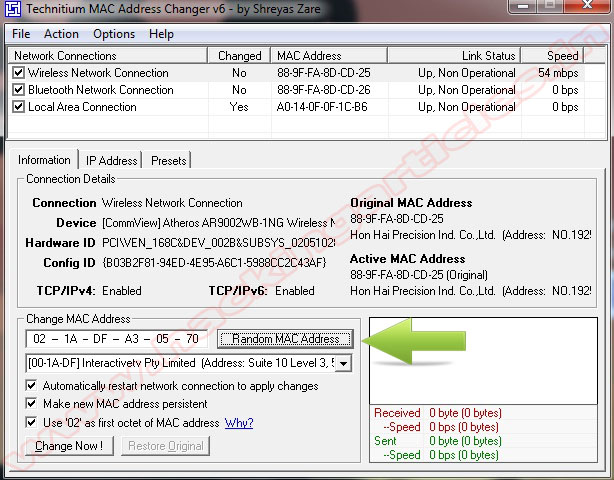
Technitium MAC Address Changer

Technitium MAC Address Changer allows you to change (spoof) Media Access Control (MAC) Address of your Network Interface Card (NIC) irrespective to your NIC manufacturer or its driver. It has a very simple user interface and provides ample information regarding each NIC in the machine.
tectium How to Change MAC Address
Download

SMAChttp://www.klcconsulting.net/smac/
Change MAC Addresshttp://lizardsystems.com/change-mac-address

Wireless Wi-Fi Hacking Commands in Windows 7

How to Detect list of available Wireless Networks
Click Start, click Run, type cmd, and then click OK, to open a command prompt.
At the command prompt, type 
netsh wlan show networks mode=bssid

 sshw+netwrk Wireless Wi Fi Hacking Commands in Windows 7


How to Connects to a Wireless Network

netsh wlan connect name=MTNL
Replace MTNL with your own profile name
cnnect Wireless Wi Fi Hacking Commands in Windows 7

How to disconnect to a Wireless Network

netsh wlan disconnect
discnnect Wireless Wi Fi Hacking Commands in Windows 7

How to show available Wireless Network profiles your PC

netsh wlan show profile
prfie Wireless Wi Fi Hacking Commands in Windows 7

How to Saves wlan profiles as XML files to the specified location

netsh wlan export profile name=MTNL
prfie+exprt Wireless Wi Fi Hacking Commands in Windows 7

How to Block a Wireless Connection

netsh wlan add filter permission=block ssid=netgear networktype=infrastructure
bck+netwrk Wireless Wi Fi Hacking Commands in Windows 7
If you want to block this computer from accessing all wireless network use denyall option in the command. 
netsh wlan add filter permission=denyall networktype=adhoc

How to show the blocked network

netsh wlan show blockednetworks
shw+bck+netwrk Wireless Wi Fi Hacking Commands in Windows 7

How to show the installed Wireless drivers

netsh wlan show drivers
shw+drivers Wireless Wi Fi Hacking Commands in Windows 7

LAN hacking tips using CMD command prompt


I am Sure u guys Know All these commands…. I want to Help The Beginners.. So i am Posting This….
Useful Things to do on CMD!
First, open your Network Connection and right click and select Properties. Then Select TCP/IP and click on Properties again. Now Click on Advanced and WINS tab. Select Default for NeBIOS.
Now back to the main Local Area Connection window, select File and Print Sharing for Mic****ft Networks and hit enter.
This is just to make sure you have NetBIOS enabled. We will have some fun with NetBIOS on CMD.
First thing you need to know is some very helpfull commands to use on CMD(Command Prompt).
In case you don’t know how to get CMD open in your box, then click on Start, then Run, then type “cmd” (no quotes, off course… you know the drill).
Back to commands:
CODE
nslookup
net view
net use
net user
ping
tracert
arp
route
nbtstat
netstat
ipconfig
In case you don’t know some of them, then just type the command on CMD and hit enter. A little help will show up in your screen. Read it and understand what the command does.
Lets start easy…
1) ping : This command will allow you to know if the host you pinging is alive, which means if it is up at the time of executing the “ping” command.
CODE
ping x.x.x.x (x is the IP address)
or
ping http://www.whatever.com (www.whatever.com is the website you want to ping, but you don’t know the IP)
OBS: Keep in mind that if the host you pinging is blocking ICMP packets, then the result will be host down.
2) nslookup : This command has many functionalities.
One is for resolving DNS into IP.
Lets say you know the website URL but you don’t know its IP(and you want to find out).
nslookup http://www.whatever.com (www.whatever.com is the website you want to find out the IP)
Now, another really nice function of nslookup is to find out IP of specific Mail Severs.
QUOTE
nslookup (enter)
set type=mx (enter)
yahoo.com
This command will give you the mail server IP of yahoo.com. You can use whatever server you want and if it is listed on DNS, then you get the IP. Simple, isn’t it?
OK, now why would you want to have an IP of a mail server?
To send spoofed mail to your friends or even for SE.
In case you looking for “How to spoof email”, then look for my “How to spoof email tutorial”http://www.infowar.com/forums/showthread.p…p;threadid=2360
3) tracert : This command will give you the hops that a packet will travel to reach its final destination.
OBS: This command is good to know the route a packet takes before it goes to the target box.
CODE
tracert x.x.x.x (x is the IP address)
or
tracert http://www.whatever.com (www.whatever.com is the website you don’t know the IP)
4) arp : This command will show you the arp table. This is good to know if someone is doing arp poisoning in your LAN.
QUOTE
arp -a
5) route : This command will show you the routing table, gateway, interface and metric.
CODE
route print
6) ipconfig : This command will show tons of very helpful things.
Your IP, gateway, dns in use.
CODE
ipconfig
or
CODE
ipconfig /all
this command will give all that info but for all networks you might have it.
Also, in case you have a dynamic IP and want to change it, then type…
CODE
ipconfig /release (this will release your IP)
ipconfig /renew (this will renew your iP)
OBS: Keep in mind that those commands will change your IP, but the new IP will still be tighed up to you. So don’t do anything stupid.
7) netstat : This command will show you connection to your box.
CODE
netstat
or
CODE
netstat -a (this will show you all the listening ports and connection with DNS names)
netstat -n (this will show you all the open connection with IP addresses)
netstat -an (this will combined both of the above)
8)nbtstat : This command will show you the netbios name of the target box.
CODE
nbtstat -A x.x.x.x (x is the IP address)
nbtstat -a computername
net view x.x.x.x or computername (will list the available sharing folders on the target box)
Now some hints:
CODE
net use \ipaddressipc$ “” /user:administrator
(this command will allow you to connect to the target box as administrator)
Now if you want to connect to the target box and browse the entire C drive, then use this command:
CODE
net use K: \computernameC$
(this will create a virtual drive on your “my computer” folder)
OBS: Keep in mind that this will only works if the target box doesn’t have an administrator password set.
And least but not last, the “help” command.
CODE
whatevercommand /help
CODE
whatevercommand /?
This command will help you to understand what it does and all the switchs available for each command.
Very useful if you know the command, but forgot the right switch.

Lock/Unlock Computer With Pendrive


First, what is “syskey”?
SYSKEY is a utility that encrypts the hashed password information in a SAM database in a Windows system using a 128-bit encryption key.
SYSKEY was an optional feature added in Windows NT 4.0 SP3. It was meant to protect against offline password cracking attacks so that the SAM database would still be secure even if someone had a copy of it. However, in December 1999, a security team from Bind  View found a security hole in SYSKEY which indicates that a certain form of cryptanalytic attack is possible offline. A brute force attack then appeared to be possible.
Microsoft later collaborated with Bind View to issue a fix for the problem (dubbed the ‘Syskey Bug’) which appears to have been settled and SYSKEY has been pronounced secure enough to resist brute force attack.
According to Todd Sabin of the Bind View team RAZOR, the pre-RC3 versions of Windows 2000 were also affected.
So this is pretty cool, right?  Well, I really like the idea of keeping this on Floppy so that it requires a floppy disk (a sort of 2 factor (hardware/software) authentication?).
Naturally I wanted to go a bit further and use this on a USB drive instead of storing to a Floppy.  I can’t see myself carrying a floppy and a USB floppy drive around with me.  After all, this provides another layer of security.
NOTE:  I haven’t tested copying data from 1 USB to another USB to see if it works as a backup.  This way you could lock up a USB drive as a spare if needed.
Here’s how to get this to work using a USB drive.
1.  Insert your USB drive into your system and wait for it to be recognized and install any necessary drivers.
2.  Fire up disk management and re-assign the drive letter it was given to “A”.

Start up disk management by clicking Start and typing diskmgmt.msc


Right-click the USB drive and choose to assign driver letter or path.

Assign it to letter “A”

Accept the warning message

Now your USB drive is “A”

3.  Run Syskey and save encryption to USB Drive “A”

Click Start and type syskey followed by hitting Enter

Syskey launched; Click “Update”

Choose “Store Startup key on floppy disk” and click “OK”

You’ll be prompted to enter your diskette. Make sure your USB drive is inserted and writable.
4.  Reboot and have fun.  Don’t lose your USB disk!  Also, to revert this, you can run syskey again and choose to store it locally instead of “on a floppy disk”

How To Hack Windows Administrator Password In Safe Mode


Have you ever tried using someone’s computer when they said you couldn’t? And you cant log in because they have a password? Below is the step by step procedure where you can log in to machine
Just in case anyone is confused:

Your Acount Name – the account name you wish to have
Victim Account Name – the account name of which you wish to change the password.
Step 1:

Restart the computer, and when it boots back up tap the f8 key a few times to go to a menu that asks about safe mode.

Step 2:

Select safe mode with Command Prompt. It should load into safe mode allowing you to use CMD.

Step 3:

Now what you need to do is type this command:

net user YourAccountName localgroup administrators /add

NOTE: What this does is is create the account in the administrators group. =)

Step 4:

now type

shutdown -r -t 1

NOTE: this restarts the computer. Then log in with your newly created account.

ALTERNATE PROCESS:

Another way to do this is to do the same thing as earlier and boot into safe mode with command prompt.

Type this:

net user VictimAccountName *

You should see this output

Please Enter a new password:

Please Confirm new Password:

To add your account to the admin panel type this: net localgroup administrator “username” /add

This takes the account specified and changes the password to what you want.

How to Activate GodMode in Windows 7 | God Mode in Windows 7


Windows 7 is now becoming popular among windows operating system users.Windows 7 has cool hidden feature ,people calls it godmode inwindows 7.GodMode is a folder that brings together a long list of customization settings allowing you to change all your settings from one place.This is very good as you can now change all your windows settings from one single place.


I've broken it down into five-step process to avoid confusion:

Step 1: Right click.


Step 2: Click create folder.

Step 3: Name your sparkly, new folder this, "GodMode.{ED7BA470-8E54-465E-825C-99712043E01C}" and press enter.

Step 4: Blink as the folder changes form to look like the control panel.

Step 5: Open the folder and bask in all your godly, control panel-y power................