Tuesday 22 April 2014

4 Best Websites to Learn Software Programming

4 Best Websites to Learn Software Programming


4 Best Websites to Learn Software Programming

A site of programming languages has made its way into the tech world in last 2 decades. And each of these trumps others riding on its glorious capabilities. While working on them is not fun by any stretch, the final product as a result of logical thinking and application of extensive skills is something web users around the world cherish.


And all these factors has lead to a huge boom in the software development sector. Students around the globe are more than willing to learn programming languages in order to stand better chances of grabbing a job when they graduate. There are various training institutes for getting trained on different programming languages. While these institutes are greatly equipped to help students grab the most important concepts an a most effective manner, trainees also need to do their bit on their own end. There are various sources on the Internet that can help them in learning different programming languages like PHP, Java, .NET, C#, etc.

These websites either offer online tutorials, or are the places where you as a learner can find answers to the most difficult and common question you often find yourself asking people.

In this article, I bring to you some such websites that have gained immense popularity in the developer community:

Stackoverflow.com

Stackoverflow

If you have been into programming from quite a while, there is a slim chance that you haven’t head of Stackoverflow.com. This is an immensely sought-after website where you can find developers from all parts of earth. You can find beginners as well as the most skilled programmers here. On this site, people often ask question for which there are elaborative answers provided in the form of full-fledged codes and program snippets. These code snippets are more often than not read to compile and help the learners to grab intricate concepts with much more ease. And if you can’t find what you are looking for, simply ask it, and you will see many hands raised there.

leetcode.com

Another websites that does not skimp on details while helping the learners get a firm grasp on different programming languages. There are dozens of programming languages being covered here, and irrespective of whether you are learning .NET or PHP, you are set to find all the answers right here. there is a huge literature on all the languages and you can refer to various pages for any confusions or doubts regarding the coding. You can go to the Q & A section to check if the question you have in mind is already asked there or not. It is a very responsive site that makes v=navigation between different pages easy and fuss-free.

asp.net/web-forms

asp.net

This particular website is a haven for those looking to hone their skills in ASP.NET, and also for those who have to start from scratch. Practical PHP Programming is an extremely informative website that makes use of some insightful tools to impart incredible PHP lessons to the most untrained of minds. The time spent on this site learning .NET proves to be fruitful as you are made aware some of the most complex aspects of this language and platform. The Model View Controller is studied in detail and all the latest features are covered in this site.

Github

Github
You can in detail learn how to use the APIs associated with different languages. Introduction to the most basic as well as the very advanced aspects of programming is done cleverly by the means of this website. Learning the programming language becomes a rewarding process as this website makes it an experience much cherished. You can even create a new project and host it without paying a penny. Now that’s a feature not every website offers.

With options aplenty, making a choice would be difficult, but worth all the fuss

How to Safeguard Your USB Drive - 10 Easy Steps

How to Safeguard Your USB Drive - 10 Easy Steps!


How to Safeguard Your USB Drive - 10 Easy Steps!
USB drives are a fantastic way to share information from computer-to-computer. While many people use email to send documents, USB drives can take just about anything that your computer has and move it to another system with minimal effort. Plus, USB drives can be used to share information without actually putting it in someone’s possession. Doing so can keep sensitive data from falling into the wrong hands. If you have a USB drive, though, there are still extra measures you should take to secure its contents. Continue reading for 10 easy steps that you can take to safeguard your USB drive.

Proper Password Management Protects Your USB Drive

First, let’s make sure that if anyone gets a hold of your USB drive, they won’t be able to use it.


  • Insert your USB drive into your computer.
  • Find the USB drive in your computer’s “Devices with Removable Storage” section or similar area.
  • Right click on it and choose, “Turn on Bitlocker.”
  • Once you choose this, Wizard will open up, and you’ll see the option to “use a password to unlock the drive.”
  • Type in the password that you would like to use for your USB drive and click next.
  • You’ll be asked how you’d like to “back up Recovery Keys.” Simply choose from the menu.
  • Next, you’ll be asked to confirm whether or not your USB drive is already being used or if it’s brand new.

Encrypt Your USB Drive

Now you’ll want to encrypt the information that is found on your USB drive. This is a further measure that will make sure that your drive is protected from prying eyes, no matter how badly they want your information. After the above 7 steps, Wizard will ask you how much of your drive you’d like to encrypt.

  • You’ll be given the option to encrypt the entire drive, which is best for those that are already in use, or just the used disc space, which is preferable for a new drive. The former option will take longer.
  • After you make your choice, the encryption process will start.
  • When the encryption process is complete, you can remove your USB drive, confident that its contents are now safe.
Going forward, whenever anyone wants to use the USB drive, they’ll be prompted to enter your password first. You can follow the same steps to change the password, as well, if you should so choose.

Keep in mind it’s also important to store your USB drive in a safe place at all times. Even if someone doesn’t have your password, possessing your USB drive can still be damaging, as you no longer have access to the data, either. If the USB drive contains information related to your company, check with human resources or your management. There are often official guidelines specific to securing USB drives that carry company data.

While USB drives are extremely convenient, they can easily expose you to information leaks if not controlled properly. Maintain your USB drive in a secure place at all times, and use the above 10 steps to encrypt the information and protect it with a password.

Source:
http://geekofreak.com/2013/03/encrypt-and-password-protect-your-usb.html

Best Utility Apps for iPhone

Best Utility Apps for iPhone


Best Utility Apps for iPhone

While the iPhone is a great help to everyday life, it is necessary to check if its applications function up to its greatest potential. For as long as everything is up and running perfectly, you can enjoy every feature without a problem. To keep your iPhone’s functionality, here are some apps to use:

BatteryMagic

There is an icon on your iPhone screen that tells you how much percentage of battery is left. Once it reaches the lowest portion, it is a signal that you have to charge it. Indeed, the icon is a helpful warning sign but you ought to know that better battery consumption is what you can enjoy with the BatteryMagic app. The BatteryMagic app is free for the beta version and paid for the BatteryMagicPro version. This app provides an indication on how much battery is left for a specific running application such as Wifi, 3G Internet, Talk Time, Game Play, Stand-by Time, Audio Playback and Video Playback. For the pro version, you are able to check if the battery life is enough to show a full-length movie.

iNotify

Priced at 99 cents, iNotify is an application that allows you to check on important appointments or errands under your to-do list. This notification appears on your lock screen, therefore every time you take a look at your phone, you are reminded of the things you need to accomplish within the day. The iNotification can be easily customized. You can add or remove activities under the list.

AppBoxPro

AppBoxPro garnered a number of thumbs-up because of its multiple functionality. This all-in-one app provides a number of utility apps that are totally helpful and beneficial. AppBoxPro comprise of the following: currency converter of up to 195 currencies, clinometer, battery life, loan calculator, 52-language translator, holidays observed in 83 nations, flashlight with adjustable brightness, sale price calculator and tip calculator. The best thing is that this app costs only 99 cents.

Camera Flash and More

If you love taking photos, the Camera Flash and More App is a great feature to have on your iPhone. As you use this app in taking photos, you can increase or decrease the brightness of a particular photo. You can also use this app in customizing photos, making them black and white or in a sepia format. If you want to add some fun with your photos, this app allows you put some funky effect on them. You can get this app at 99 cents.

SpeedTest

If you think that your connection is running slow on your iPhone, it’s time to do a speed test. By downloading and installing the SpeedTest app on your device, you can check whether or not connectivity is running correctly as it should. In the case of getting very slow speed, you can get in touch with your ISP to report the issue. If you are getting good results from the SpeedTest, you can perform tasks requiring connectivity efficiently. SpeedTest is a free app. You can use this app at any time and place.

WiFi Locator

WiFi connectivity is what allows iPhones to acquire connection to the internet. Since 3G/4G/LTE is always difficult to obtain, the WiFi locator can be more reliable. By using this app, you can connect to any desired network as long as no password is required. You don’t need to walk around finding a good WiFi spot because the WiFi Locator will provide all the information on your screen through the maps app. The WiFi Locator helps you find the strongest signal and strength of network signals are sorted on your phone for viewing. Thus, you can easily determine which network to try first.

Your iPhone can truly do wonders as long as you have the right helpful apps in it. The best thing is that these apps are very affordable, they won’t break the bank.

5 SEO Success Secrets

5 SEO Success Secrets:


The awareness of what signs algorithms are looking for is fundamental towards SEO success. Here are 5 SEO success secrets you need to put into practice:

1. Acknowledge the relevance of high PR links

Despite what some might say high authority links are still incredibly important. The Google algorithm seeks high PR in order to decide which sites acquire the highest rankings.

If you’re still unsure then why not test it out for yourself? If you have the availability to SEO software that gives link profile readouts, try and search for some key phrases and then run the reports on the top 10 sites that come up. You will most likely find that the sites with the highest rankings are the ones with the highest PR links.

2. Link diversity is crucial

As important as high PR links are, link diversity is even more important, and no, that does not mean blog comment spamming and automated links; that will upset Google. To really boost your rankings, and to make Google happy, you need to show diversity in your link building approach as well as using a combination of dofollow and nofollow links. Here are a list of places you can explore to help you find top links that will enrich your link variety: Web 2.0 sites, press releases, article directories, Wordpress/Blogger, social media sites, and social bookmarks.

3. Do it the natural way

A few years back, automated link building was a major thing where you could find software that would create as many links as possible to help boost your site’s rankings. However, Google’s algorithm updates weren’t too fond of the method, and so automated link building is no longer effective. Therefore, for betterSEO management, you should opt for the organic approach by manually seeking a variety of high PR links that you can build your links upon.

4. Stay relevant

Always make sure that you keep significance at the forefront of your mind. Despite the importance of link diversity, it is crucial that you build your links upon sites that are actually relevant to what your site is about, or else you may find that your SEO is less effective. Therefore, you should aim to find links that actually relate to the content of your own. 

5. Be multi-media savvy

Text only websites are always the least attractive. To make your site more appealing you need to include a range of images, sounds and videos etc. in order to boost your on page SEO and satiate Google algorithms. If you feel like your site is perhaps lacking in this department, well, it looks like you know what you need to do next.

Monday 24 February 2014

How To Install PHP MySQL And Laravel Framework In Windows Step By Step

How To Install PHP MySQL And Laravel Framework In Windows Step By Step


n this tutorial i will guide you through the installation of PHP and MySQL in windows , and additionally how to setup PHP framework laravel and Composer with git . php5.4 and later versions have inbuilt development server so in this tutorial i won’t be  cover all the webserver setup and all just simple php and mysql with composer and inbuilt development web-server . so lets get started .

Setup overview

  • PHP  ( Server Side Scripting Language )
  • MySQL ( Database )
  • Composer  ( Dependency manager )
  • Git  ( Version Control System )

Installation

PHP  :

 Download  PHP 

and extract the php file in  C:\php   or anywhere just remember the location , after extracting the php lets setup windows PATH variable , so we can access php from CMD ( command prompt ) .  How to setup Environment Variable in windows : just simply follow the steps
  1. open My Computer and click on propertiesproperties
  2.  click on advance system settingsadvance
  3. Click on the Environment Variables From System Properties windowWindows system environment variables
  4. Choose System variables and select PATH and click editedit
  5. Add  ”  ;  ” ( without quotes )  and add php locationdone
  6. Click OK and OK again and Press Windows + R and type CMD  and type  php -vphp windows cmd
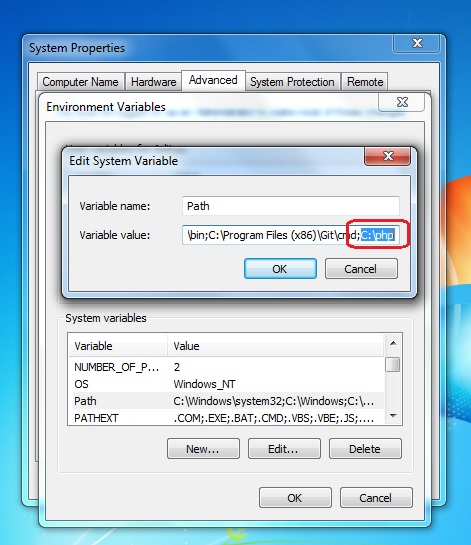
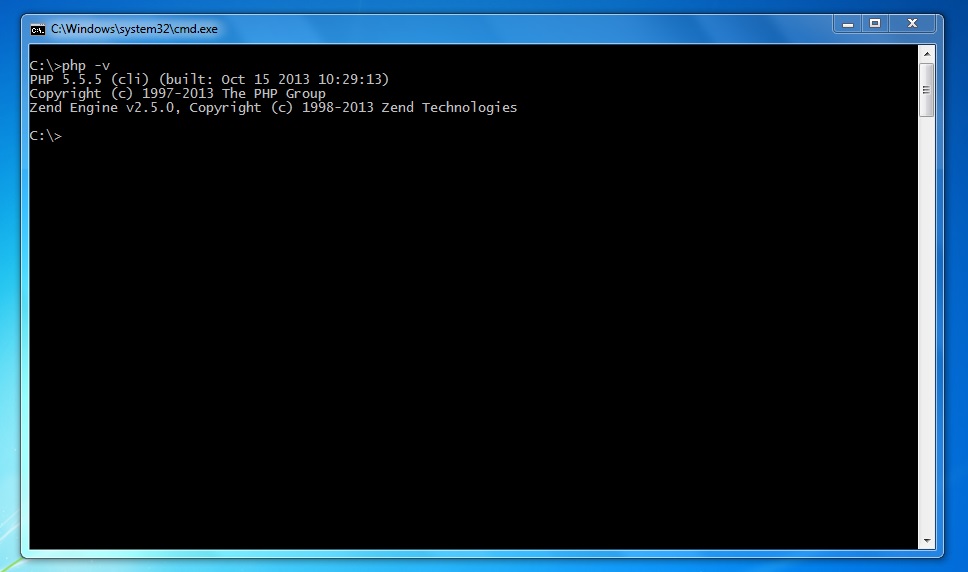
if you are getting that kind of output  , Congrats now php is installed and accessible from CMD

MySQL :

MySQL comes with windows installer but i will show you how to install using zip package . Download and extract zip in C:\MySQL  and setup environment variable exactly like how we did setup for PHP .
MySQL 
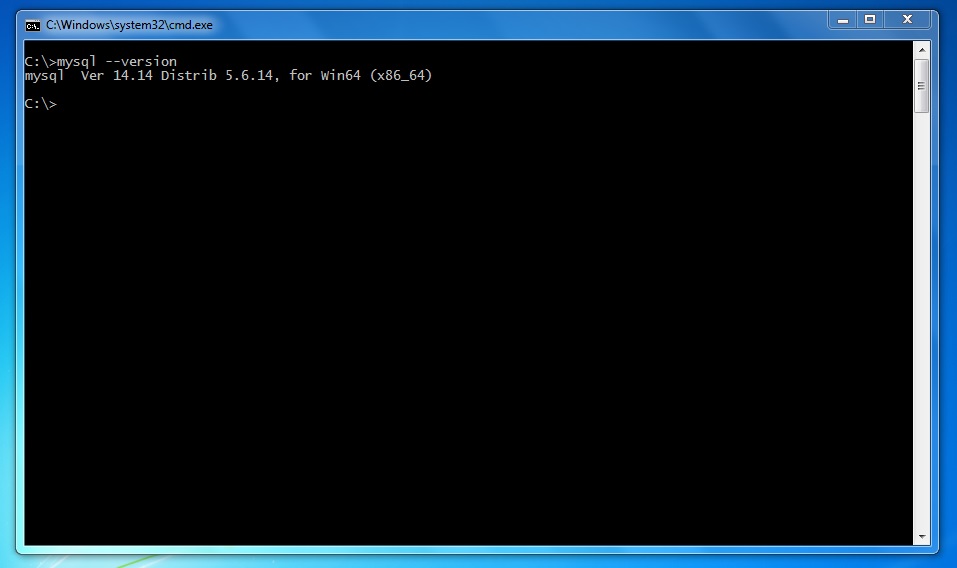
now secure the mysql initial user account see this guide : http://dev.mysql.com/doc/refman/5.5/en/default-privileges.html
MySQL Service in windows
if you want to start mysql when you log on then install mysql service and select automatic start ,
click on start >>all programs >> accessories > then right click and open Command prompt as admin
cd  c:\mysql\bin
C:\MySQL\bin>mysqld --install
and now open service manager and find MySQL service then click on properties set automatic start

Mysql Service
 now php and mysql is installed lets install composer  . Download windows installer and install like another windows package . just choose correct php location when installing .
Composer on windows
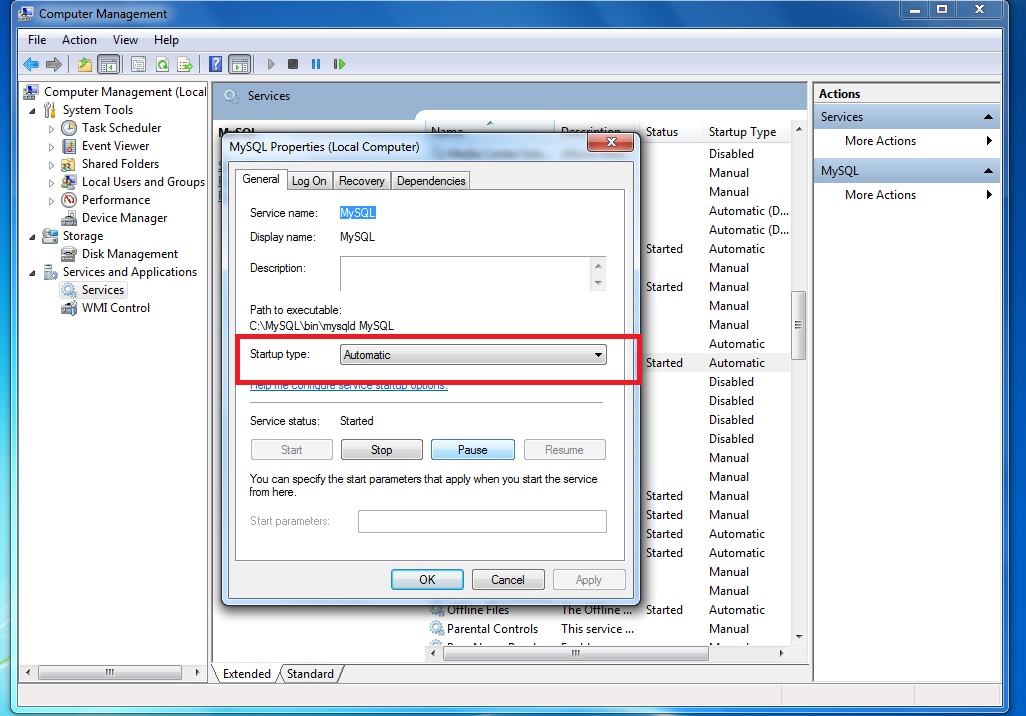
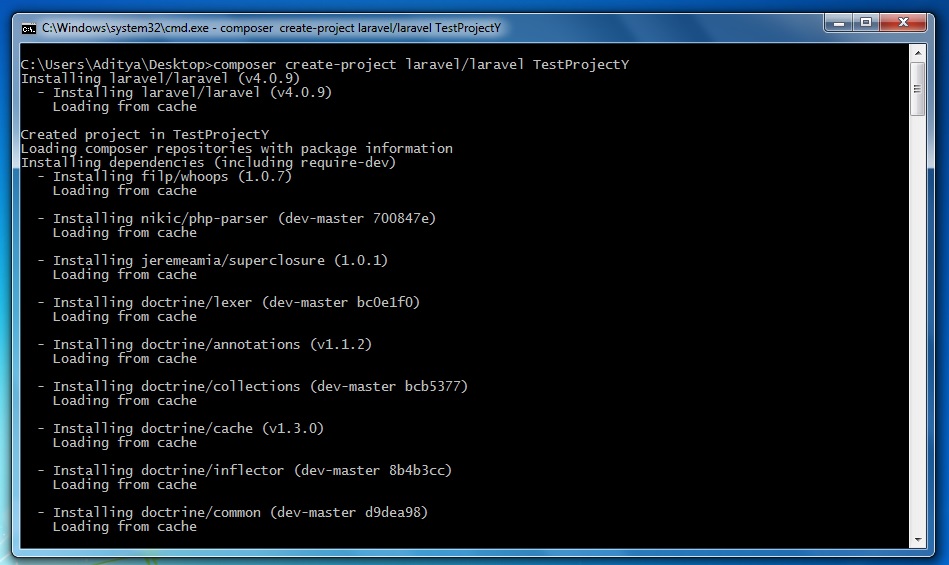
open CMD and type ” composer –version ” and make sure it print version otherwise troubleshoot your installation  .

Laravel

Now lets setup laravel  ,  Laravel is php based  MVC framework  if you are confuse its like ASP MVC and Ruby On Rails framework just written in PHP . let’s install  , open CMD  and paste
composer create-project laravel/laravel TestProject
wait for time it will take some time to install all the dependencies , if you are getting openssl error then simply open php.ini file and fix extension dir path ( see the php folder that we extracted at the time of installation )
extension_dir = C:\php\ext
and change
;extension=php_bz2.dll
//to 
extension=php_bz2.dll
then try again , i am sure it gonna work . now wait until it finish setting up dependencies .
laravel project
after that lets start development  server  . open CMD cd to project root and laravel comes with a tool calle artisan
lets fire up dev server using artisan
php artisan serve
then open browser and open http://localhost:8000 , and you will see default laravel page .
Some important links

Saturday 25 January 2014

Remove Write Protection From Pendrive and Memory Card – How to Guide


Remove Write Protection From Pendrive and Memory Card – How to Guide


Don’t you just hate it when you buy a Pendrive or a Memory card and there’s nothing you can do to it? Whether it comes with software on it, or you’re just trying to use it for any other purpose, you should have the right to change things up however you like.


In this guide, you will be shown how to Remove Write Protection From Pendrive and Memory Card. It’s a fairly simple process, so be sure to follow each and every step carefully. This guide is for information purposes and we are notresponsible for anything that may happen to your device in the process.


Before we proceed, what is Write protection exactly? Write Protection is when the manufacturer locks the device down from being written on and prevents unauthorized access to add, change or delete the files on the device. While the uses of write protection is a good thing because it prevent files from being tampered with and the manufacturer can make sure all users are getting the same files, but it’s also very inconvenient. To remove this protection, to you will need to format the drive.

In this guide, I will show you exactly how to do that. Follow each and every step carefully, please. Windows platform is used for the purpose of this guide.
How to Remove Write Protection From Pendrive ?


Step 1: Plug in your pendrive into your USB 2.0 on your computer. In order to make sure the computer has read your pendrive, you can go down to your bottom left on Windows, you will notice a small USB drive icon. If you click that, it will say “Removable Disk.” This means that the pendrive has been read successfully. You can take a backup of your files from the pendrive or Memory card, Because we here are going to format it Completely.


Step 2: Next we need to open up command prompt. You can do this by simply going to “Start”, then just search for “Command Prompt”, or you can simply just type in “cmd” and command prompt should pop up.

Step 3: In the command prompt, type in the drive letter of your pen drive with a colon at the end, like this: “ F: ” but without the quotation marks.

Step 4: After putting in the previous command, type in “format” without the quotation marks. Here’s how to do it: “format F:” and then press “Enter.”

This should get the process started to remove write protection. Make sure that you are entering the right command with the right drive letter. If you have more than one pen drive plugged in, make sure that you do select the right one as you can accidentally format the wrong drive, causing loss of data.

Step 5: After the process is complete, proceed to closing command prompt.


Congratulations! You’re successfully removed the write protection on your drive.

If you have any questions or concerns, please write them in the comments section below. Let us know how we did and how things went for you.

How to Check Original Installation Date of Windows


How to Check Original Installation Date of Windows


Many a times we want to know more and more about our System, What if a Friend of yours asks you some Questions about your PC and you fail to answer it, You may be Curious to Know the Original Installation Date of Windows. We all want to know when our windows was First Installed, How many months or Years have passed since you are chugging without Refreshing your System.

Also Read: New Features in Windows 8.1: What makes it better?

The Process to know the Original Installation Date of your Windows is Very Quick and Simple, Stay with me, read on and i will tell you how to do it Step by Step.
Steps to Check Original Installation Date of Windows

Step 1: Hold Windows key and Press R key to open Run, Type CMD and hit enter to Open up Command Prompt.

Step 2: Type systeminfo.exe in Command Prompt and Hit Enter.


Step 3: Just wait a Few Seconds to Gather all the Data , Boom- You will Get all the info of your System in just a few seconds including the Original Installation Date which we are looking for.


Step 4: With this Command you Get all the Necessary info about your System but If you Just want to know the date on which your windows was Installed on your System then type this Command systeminfo | find /i “install date


You can see its showing that i have installed my windows last month as i had to Refresh my Windows, its pretty much Accurate.

Thats it guys, in this tutorial we saw how to check our system info including the Windows Installation Date.
If you have any trouble related to this article, have a go and Speak your mind in Comment box. I will be more than happy to hear from You.

New features of Google Maps that makes travelling easy


New features of Google Maps that makes travelling easy:


Apple has completely revamped their operating system iOS, by launching iOS 7. iOS 7 has a completely new look with a lot of advanced features. Google brought Google Maps back to iOS in December last year and till date Google is keep on bringing new features to the Google Maps app to make it much more useful. Some major features were added in the Google Maps app which were live traffic updates, transit update which crossed 10 million downloads of the app.


Now Google is bringing smaller yet significant changes which will definitely make it easier for you to travel using Google Maps. Today in this post we are going to tell you the 4 New features of Google Maps.
New features of Google Maps

1.Directions for multiple locations :

This is the one most required feature which one should provide in a navigation app. Previously Google has included this feature but it was stripped out later. In the recent update it was seen that this feature was brought back in the app and is not only available while driving but you can also get directions for multiple locations while biking and walking.
2.Multiple Directions for Attractions present in the City:

This feature is actually a part of the above feature. Using this feature people who have visited attractive locations in the city and founded them attractive can mark them up. You can also maintain the order of pinning using the drag and drop feature so that a route can be maintained and all the places can be visited without wasting of time. Using Google Maps you can also have the street view which will help you in better understanding the location and what you can also have a preview of your destination from your mobile phone only.
3.Finding Pre-booked flight tickets, hotel reservations:

We founded this feature as one of the best feature which was brought in Google Maps. Borrowed from Google search, this is one great addition to the Google Maps app. If you have previously used Google maps and you know the airport code or name of the places you where you have dined, you can enter those keywords and Google Maps will help you to get the directions of those locations. In a way Google is helping in refreshing up your memories. However you need to be logged in your Google Maps account for accessing this feature. If you are residing outside US you have to wait to use this feature as this feature is currently available for US and is only available in English.
4.Look for upcoming events :

Now you can see which events are going to take place by selecting the venues. Let’s say you want to find out which events are going to take place in the O2 Arena in the upcoming week. Just search for O2 Arena and then tap on Upcoming events. You will see a list of scheduled events that are going to take place in O2 arena in the upcoming days.

Websites to Download eBooks Free


Websites to Download eBooks Free


It would be nice if we can Download eBooks Free and take it with us on our devices, as it is not possible to take a book to any place as it may be fat and also includes the weight and we can`t get the frequent updates for it. There are many sites where eBooks can be obtained for free, downloaded and can be enjoyed from any Android device.


For popular and “new release” reading materials or magazine, an online eStore like Amazon or Barnes & Noble is essential but this sites are not free of cost. So here are some of the websites that gives you free downloadable eBook Specially for Tech Students.
5 Best Websites to Download eBooks Free
1.Free-eBooks:

It is an online store for free ebook authors, ebook resources, ebook downloads. Besides of it you can also download free magazines from it. Each ebook has its own short review in the description. You can also submit your own ebook, you just need to become a member of the Free-EBooks.Net to access their library. You can Register it for free.

Goto: www.free-ebooks.net


2.Many Books:

It provides you with free ebooks for your eBook Reader, iPod or PDA. You can browse for any ebook through the most recommendations or recent reviews from visitors or you can even search and download free books in categories like scientific, engineering, programming, which you may feel interesting. There are 23,568sss eBooks available in it and they’re all free.

Goto : www.Manybooks.com
3.Globusz:

It is a unique ebook Publishing house, specialized in free eBook downloads. It also provides an excellent Star rating Showcase for new and evolving authors to come front with their thoughts or ideas. It is very well categorized by topics which is friendly to use, and it also consists of 10 top level categories, and over 125 sub-categories.
4.KnowFree:

It is a free website for ebook where users are able to exchange e-books for free and it also gives video training and other materials for educational purposes and also includes self-practice. It consists of thousands of documents like literature, lists, maps, databases, technical references, etc.

Goto www.knowfree.net
5.Online Free ebook:

It provides various links to various ebooks (pdf format) spanning in 9 categories which are used fors daily purposes, they are: Business Ebooks, Gadget Ebooks, Engineering Ebooks, Automotive Ebooks, Health & Medical Ebooks , Hobbies Ebooks, Hardware Ebooks, Sport & Martial Art Ebooks, Programming & Technology Ebooks. It is especially designed to add all this stuffs in your Pocket PC, EPOC, Windows CE, Symbian or other handheld device.

Goto www.onlinefreeebooks.net

Find lost Smartphone using Google’s Android Device Manager


Find lost Smartphone using Google’s Android Device Manager


If you are unable to Find lost Smartphone and you haven’t loaded any app into your smartphone then you need not to worry as there is one method using which we can find your lost Android smartphone and that is by using Google’s Android Device Manager. If your phone is stolen or you have misplaced it anywhere in your home you can use Google’s Android Device Manger to find it.


All the Android smartphones come with Google Play installed in it. When you use Google Play for the first time on your Android smartphone or even on your tablet, Google installs Android device manager in your smartphone or tablet without your knowledge.
How to Activate Android Device Manager

Follow the steps below to activate Android device manager on your smartphone or tablet.
Go to Settings
Then move to Security
Then move to Device Administrators
You will see some apps there and the first one would be Android Device Manager
Tap on it and Activate it

Once you have activated Android device manager on your smartphone, you need to go to your web browser and follow the steps to find your lost Android device.
Visit the Google Play home by clicking on this link
You will see a Gear icon on the top right corner
Click on it and you will see Android device manager
Click on Android device manager
Once Android device manager is opened in your web browser it will automatically contact your device. The map of your country will be displayed on your web browser.
Once Android Device Manager has located your smartphone you will see its location on Google Maps and the distance it is away from you right now.

Now you will have three options there.
1Ring the Device:

This feature will ring your smartphone at fill volume for 5 minutes even if it is silent. Unfortunately the device won’t ring if it is switched off.
2.Lock the Device:

This feature will lock your Android smartphone and will be provided a new password to access it. You can set your desired password on your lost smartphone.
3.Erase all Data :

Using this feature all the data which is present in your Android smartphone will be deleted which will include images, music or other files. However it won’t delete the contents of your SD card and Android device manager won’t work once you have erased all the data. It will Factory reset your smartphone.
Apps to Find lost Smartphone

If you are looking for an app which can find lost Smartphone then we suggest you to check Android Lost, a great app which will remotely control your lost Android smartphone.

Alternatively to Find lost Smartphone you can always have Find my Phone as a Secondary Option.

How to Get Back the Start button in Windows 8

How to Get Back the Start button in Windows 8


Have you used Windows xp or Windows 7 and now you are Using Windows 8? if yes then very first thing you will miss in windows 8 is the Start button. for some good reason may be microsoft Decided to drop the idea of Start button in windows 8 like we had in earlier version. Many people kind of didn’t liked this change because they were addiced to the habbit of start button,

Get Back the Start button in Windows 8

Meanwhile there was a Recent upgrade to windows 8, ie windows 8.1 and the Start button is back. this article is  for windows 8 users who have not upgraded or can’t upgrade and wish to Get Back the Start button in Windows 8. So I have Come up with interesting Solution which I wish to share with you all which will help you to Get Back the Start button in Windows 8.

Steps to Get Back the Start button in Windows 8

I will Show you two Easy methods to Get Back the Start button in Windows 8.

1.Have a Windows Start Menu Toolbar:

Yes , you can have or create a start Menu on the toolbar, and this can be done by following below mentioned easy steps.

Firstly enable the Show hidden files option.
Now Create a New Folder, Now Copyand paste all Files, Docs, Setups or Programs that you Use Daily and Wish to have it within seconds in this new Folder.
Now  a right click on the Taskbar , Hover your mouse on Toolbar then select a new Toolbar from the Toolbar option.
And finally browse to the New Folder you Created and click select folder. With these above mentioned steps you will see a new start menu folder on the Right hand side of the task bar. this is not your start button like we had in windows 7 and xp but this is very close to it.

 2. Get Back the Start button in Windows 8 Using Softwares.

You can also have few more softwares or options by which start button or start menu can be installed with more features to be enjoyed, and without any defects/problems that you can face after the installation.

1.Classic shell : This is an outstanding free software that you can have to add up a start menu button to the Taskbar, and not only this but you are lucky enough to get a few more features that come with it.

2.ViStart 8 : This is another outstanding software which I personally recommend as I have personally tried it out in my Windows 8 PC and got a positive result from this with an amazing Start button on my taskbar which made it easy for me, and along with this I also got additional features which are cool like the ability to change the skin and much more.

3.Pokki : Up to now we have seen Couple softwares to Get Back the Start button in Windows 8 and trust me the best by far is Pokki, I can say that because many of my Friends are Using Pokki, they Never had any problem with it.

With this it Concludes my list of Softwares to Get Back the Start button in Windows 8, If you Know any other good quality Software then feel free to share with us in Comments.

Resize Image without loosing Quality – How to Guide


Resize Image without loosing Quality – How to Guide

PEOPLE HATE TO VISIT WEBSITES WHICH REQUIRE MORE TIME FOR LOADING. SO ONE SHOULD ALWAYS SEEK TO IMPROVE THE WEBPAGE LOAD TIME, SO TO DO SO YOU HAVE TO LOOK AT MANY THINGS LIKE LOADING SOURCES, PAGE CACHE, MEDIA FILES ETC. ONE AMONG SUCH MEDIA FILE IS IMAGES, ADDING BEAUTY TO YOUR PAGE, BUT AT THE SAME TIME, IT IS REGARDED AS THE MOST BULKY RESOURCES WHICH TAKES MUCH TIME TO LOAD ON THE PAGE, THEREBY CAUSING INCONVENIENCE TO THE VISITORS.Web Based Tools to Resize Image without loosing Quality1.Kraken.io :2.Imageoptimizer.net:3.Smush.it:4.Compressjpg.com & Compresspng.com :5.Punypng.com :Desktop tool to Resize Image without loosing Quality

But one can improve the page load time by cutting the size of an image to a significant amount. But even resizing the image without any proper knowledge may be troublesome as you may lose the quality it had. Though photoshop provides a nice feature to save the original quality of the pic, it is not preferred much as it’s too expensive to purchase the photoshop application for desktop or web version. So here I’m going to provide you with free online tools to Resize Image without loosing QualityJPEG, PNG, GIF, SIV are some of the image formats that can be compressed with this online application. This reduces the image to a quite considerable point without losing the image size.This application is also available in Chrome and Firefox extensionsAfter uploading the image from your computer, give the size of the image and quality you wish to have after processing. This provides only some control of the output and compression ratio But Greatly Helps to Resize Image without loosing Quality.Smush.it is the best and popular online application you can have to compress images. It is present with an up-loader as well as URL box to have the image. In this you will not be provided with the ‘enter’ option to enter the image quality as that of previous one because it automatically optimizes the image by compressing it to a limit.I would suggest you to have these application, for more control of the image quality. A slider appears as soon as you upload an image to auto control the quality of the last image. A preview panel is provided for showcasing the changes according to the quality slider change. So before downloading the image you can have the review of your final image. This application is available on different domains for JPG and PNG images.This application is available to compress the PNG files. Upload an image and you can get a compressed size of the image. Besides this, tinypng.com , a quick tool to compress the PNG images to the best level without affecting the image quality.If you need a Desktop tool to do this task then i would suggest you to have PNG Gauntlet as your first choice, You will need .Microsoft Net Framework 4.0 to run this tool on your Windows.Resize Image without loosing Quality
You won’t Face any difficulty in Using this tool as it is very User Friendly. While Optimizing the images PNG Gauntlet will show you older size and Optimized size of the image. this Program is not that Fastest at it work but Usefull.

Monday 20 January 2014

Use Two Different Profile Pictures on Facebook

Use Two Different Profile Pictures on Facebook


Yes you can use Two Different Profile Pictures on Facebook, Anxious to know how ? Stay with me and i will show you.
The Bug Was Originally Founded by Khalil (Security Researcher)
Here in this Facebook Trick i will show you how to Use Two Different Profile Pictures on Facebook, Check out the Below Picture to get more Idea.
Use Two Different Profile Pictures on Facebook
In the Above Picture You will notice that The Profile picture on my timeline and the Profile Picture in my Status are Different. Let us See how it is done.

Steps to Use Two Different Profile Pictures on Facebook


Step 1: First you have to Open your Timeline and Open your Profile Picture Album by clicking on Photos Tab, Choose a Picture that you want as another Profile Picture.
Step 2: Open that Picture in a New Window By Holding Ctrl and Clicking on it.
Step 3: Now Check the URL of that Picture, you will get something like below URL
https://www.facebook.com/photo.php?fbid=491366447588908&set=a.108695719189318.5863.100001466701828&type
All you have to do is Copy the fbid, Here in the above url, my photo fbid is 491366447588908.
Step 4: Open your Timeline, hover your mouse on your Profile Picture, you will see  Edit Profile Picture Option,Click on it and Select Edit Thumbnail.
Step 5: A popup window will appear, now Right Click on your Profile Picture and Choose Inspect Element,
Use Two Pofile Pictures on Facebook
Scroll down till you find <form action=”https://upload.facebook.com/save_square_pic.php”
Step 6: Now click on the Small arrow to Expand the Code Further.
Use Two Profile pictures on Facebook
Scroll down a bit, you will find <input type=”hidden” autocomplete=”off” name=”photo_fbid” value=”491366447588908“>
Now all You need to do is Replace the Current fbid Value with the one you Copied earlier in Step 3, You can do it by Double Clicking on the Current fbid Value and Replace it with the one you Copied earlier which is in my case :491366447588908.
Step 7: Click anywhere , Close Inspect Element Window and Now Click on Save, All Done, Now Check your timeline, update any status and you will see Different Profile Picture.
Step 8: Liked it? Learned Something new ? Then its time to Let your Friends Know about it. Have Fun!!!

Best Windows Explorer Hacks You must know


Best Windows Explorer Hacks You must know


Every Windows User is well aware of What Windows Explorer is. Windows Explorer is also known as File Explorer particularly in Windows 8. Window’s File Explorer is something we all Need to use on daily basis. So why not try to make it more Productive and Efficient with some Cool Hacks.
Here in this article i have listed 5 Best Windows Explorer Hacks that you Must be aware of to make your Files management Experience more easy and efficient.

5 Best Windows Explorer Hacks


1) Edit Send to Menu: Windows By Default allows you to Send any file or folder to Desktop, or Compress it or Mail it to the Recipient of your Choice, We Can Edit this Send to Menu to display things that you want to display, you can add or delete anything from this menu Easily.
Navigate to C:\Users\*Username*\AppData\Roaming\Microsoft\Windows\SendTo.
Appdata Folder is Hidden by Default, First unhide it by Clicking on View>Option>Folder option>View> Check show hidden files,folders and Drives.
OR
You Can alternatively open Send to Folder with Run Command, Press Win+R key to open up Run Dialog, and type in shell:sendto and press Enter.
Best Windows Explorer HacksThere You Can see Some Similar Files That were showing you in the Send to Menu. To Remove any Option you can delete that File from Send to folder. On the other hand to add Something to Send to Menu, Just Copy the folder that you want to show up in Send to Menu and Paste it there in that Folder. Now Check the Send to menu to See the Changes. All Done !!!

2) Add Copy to and Move to Folder options : We can add “Copy to Folder” and “Move to Folder” to your Context Menu. Windows Don’t Provide these options by default but we can add with a simple Registry hack.
To add Copy to and move to  folder Option : Click here to Download Add_Move_To_Folder.reg File,
And Click here to Download Add_Move_To_Folder.reg file. These files are  small regsitry file for windows that will help you to add Copy to folder and Move to Folder option. Once downloaded, Double click on it, Click Run when Prompted. then you may be asked to click on yes and ok Couple of times.
Best WIndows Explorer TricksWhen Everything is done, Right Click on any folder and check if its Showing Move to and Copy to Folder options. You Can see Move to and Copy to Folders are now added to your Context menu like mine.
Best WIndows Explorer HacksBonus Noob Tip: Hold Down CTRL key , Drag and drop Source file to Destination to Copy it. And Hold down SHIFTkey, Drag and Drop Source file to Destination to Move it.

3) Change Default Folder: Whenever you Launch Windows Explorer in windows 7/8, it opens up Library folder, but may it its not that usefull for us or we need some other folder to open up when we Click on taskbar’s Windows Explorer Shortcut. So in this hack we will Change Windows Default Folder  to our Downloads Folder instead of library.
  • To Start with we will Right click on the Windows Explorer or File Explorer for Win 8 Users from the task bar icon. A list will show up, Now again Click on Windows Explorer (File Explorer) and Click on Properties.
  • You can see a Dialog Box appears, There you Can see target path is somewhat like AppData\Roaming\Microsoft\Windows\Libraries all we have to do is change this path to your desired folder that you want to open up everythime you launch file explorer.
  • As here we are going to Change it to Download Folder we will change the path to C:\Users\*Username*\Downloads. Click OK and we have successfully changed the path now.

4) Add tabs to File manager: We will be Using a Third Party tool Which is QTTabBar (2.9 mb) to Get advantage of Tabs, just like we have tabs in our Browsers. It not only Facilitates with the tabs but also provides many other usefull features that shows up in you file explorer


5)Better File Copying Speed: Windows have made some efforts in windows 8 to improve Copying Speed. Copying FIles is better in windows 8 as compared to older versions but yet its slow and many times it Conflicts, so We will be Using TeraCopy to Takeup this task and its Fast and Effective. What it does is, it  Eliminates windows Default File-Copy Dialog  and gives us a better one.
After Installing TeraCopy, Whenever you Will Copy and paste, TeraCopy will Come into Action and do the Task for you much Faster. it also adds itself to Context Menu as an Option if in Case you prefer to Use it only when you Want to .