Thursday 23 May 2013

Hack a Remote Computer Using Ardamax Keylogger

Things we Need : -
1. Ardamax keylogger

2. Ftp account - You can create a free ftp account from www.drivehq.com

3. Crypter Software - To disable antivirus detection .

Procedure :-

1. After installing Ardamax keylogger, select and right click Ardamax keylogger icon from your tasks bar. Now select enter registration key , then put in the name and the serial number which you will get from the downloaded software folder

2. Now right click Ardamax keylogger icon and select remote installation, click next two times check all the boxes as shown then finally click next

3. Now click enable and enter a password so that no one can open the keylogger then click next three times, check "send logs every " and set your time say 5 min , Then select delivery method as Ftp, finally click next

4. Now enter your ftp account details which you created earlier in my case in enter Ftp host -ftp.drivehq.com ,remote folder -/logs ,user - test, Finally click next

5. Now check all the boxes and click next, set your time for capturing the screen shots, then click next, If you want you can also change the icon by selecting change icon as shown. Finally select next and click finish

6. If you've done all the steps correctly, you should get a server file (keylogger file ) , But this server file can be easily detected by anti -viruses , So to bypass anti viruses we need to bind and crypt the file ,So to do this open your crypter software (which you downloaded earlier) Now select file 1 as the server file (key logger file which you created) and then select file 2 as any application, select a good application(select a PDF file for best performance)finally click Crypt file, Now you will get a crypted server file ( key logger file ) which is FUD ( I.e ) Fully undetectable by anti viruses

7. Now send the fully undetectable Server file(keylogger file ) to your victim via email or upload it to any site and ask the victim to download the file.Once the victim clicks the application .Ardamax keylogger will automatically install and will send logs(containing facebook password email passwords ,chat logs ..etc) to
your ftp account .You can view your victims logs by going to your ftp account

Note:- After crypting if this Keylogger is still detected by your anti-viruses, Then please use Rinlogger (Free Keylogger )

Enjoy!!!!!!!!!!!

Turn Your Laptop Into JARVIS From Iron Man


Turn Your Laptop Into J.A.R.V.I.S From Iron Man.
Turn your laptop into super smart Jarvis in 15 Minutes :

You have probably heard about the Iron Man Personal Assistant,AKA J.A.R.V.I.S, you would have wondered if you could convert you laptop/desktop into a full featured robotic assistant,you could do it.And it is pretty easy. Although you might not be able to launch missiles and deploy security armor, you can do easy tasks like asking for weather, shutting PC down, pimp its interface etc etc...


So Lets Get It Started,What Do You Need :
# Windows 7 or 8 ( 7 is just great, 8 will work, vista will not )
# Windows Speech Recognition Macros. https://dl.dropbox.com/u/2362886/WSRMacros.msi
# A Bluetooth/Wireless Headset With Mic (optional)
# JARVIS Theme. (read below)

So That You Don't Get Confused :

We have divided the "convert-to-jarvis" mission into 3 Divisions :
- Training The Windows Speech Recognition Program.
- Setting Up The Windows Speech Macros.
- Setting Up The J.A.R.V.I.S Interface.

Step One : Train Your Windows Speech Recognition Program : 5 Minutes :

Yeah I Know, A Basic Step, But The Most Important part of "convert-to-jarvis" mission, what you gotta do is fire up the windows speech recognition program, which comes pre-installed with the Windows, way to access it is via start bar. Now choose the required Fields,and after it is done, visit the "Train your computer to better understand you" section, it is not necessary for people with clear voice/accent, but I strongly advise you to spend at least 5 Minutes on this so your computer can understand you better.

Step Two : Setting Up The Windows Speech Recognition Macros : 5 Minutes :

Now if you Have set-up-ed the Windows Speech Recog Program, you would have been trying out all sorts of cool commands, But now to spice it up, We'll use the Windows Speech Macros.I assume you would have already downloaded it from the link above and installed it.After Installing it i would advise you to put its shortcuts in two places, One in the desktop and other in the start-up folder, so it would start the second your computer boots up.So a little walk through to this software, This is a super-cool, little software that teaches your computer to talk to you interactively.Here is how to set up the commands :
Double Click The Macros Icon, and when the window pops up asking "What should the macro do?" click "Advanced." For those of you familiar with creating websites, this should be a welcome site. WSRM uses XML for commands... which makes creating custom commands relatively simple. For those of you who aren't aware of XML, it's still easy.Here Is A Little Sypnosis at what are you looking at :

<speechMacros> - This is the starting Tag, it just tells the computer that this XML file uses the Speech Macros to execute.

<command> - This is the command to be executed. Each command is basically one action... in most cases you will only need one, but for some automations you'll want to include more than one. You'll see an example of this later.

<listenFor></listenFor> - This tells the computer what word or phrase to listen for in order to do an action. Notice that there is a closing tag (</listenFor>), this tells the XML that this spot in the code is where to stop doing whatever function... in this case stop listening for a word or phrase once the computer hears it.

</command> - The closing tag for the "Command" tag... again, in XML every tag will have an opening/closing tag and what happens between the two is how it knows what to execute. In this case it knows that the command is finished once the word/phrase has been detected.

</speechMacros> - By now I think you can figure out why this is here.

Since I'm going to name my computer Jarvis, I'm going to tell my computer to listen for it's name by changing the <listenFor> tags to say the following : <listenFor>Jarvis</listenFor>

Here Is A Little Applet That will teach my laptop to Reply Me :
_________________________________________________________________________________
<speechMacros>
<command>
<listenFor>Wake Up Jarvis</listenFor>
<speak>Systems Online, Database Check, Good Morning Sir !</speak>
</command>
</speechMacros>
_________________________________________________________________________________

So Whenever I Say "Hey Jarvis" My Computer will reply me with "System Online,Database Check, Good Morning Sir ! ", You can change it to whatever you like !

An Speech Macro For Getting The Weather :
_________________________________________________________________________________

<?xml version="1.0" encoding="UTF-16"?>
<speechMacros>
<command>
<listenFor>Pull up the weather in [CityName]</listenFor>
<run command="http://www.weather.com/weather/local/%7B[CityName.zipCode]%7D"/>
</command>
<command>
<listenFor>Is it cold in [CityName]?</listenFor>
<speak>Let me check... just a moment.</speak>
<script language="JScript">
<![CDATA[
<var xml_doc = new ActiveXObject("Microsoft.XMLDOM");
<xml_doc.async = false;
<xml_doc.load("http://www.rssweather.com/zipcode/%7B[zipCode]%7D/rss.php");
<var titles = xml_doc.getElementsByTagName("title");
<var descriptions = xml_doc.getElementsByTagName("description");
<Application.Speak(titles.item(2).text + " in {[*CityName]}");
<Application.Speak(descriptions.item(2).text);]]>
</script>
</command>
<listenForList name="CityName" propname="zipCode">
<item propval="65201">Columbia</item>
<item propval="37201">Nashville</item>
</listenForList>
</speechMacros>
_________________________________________________________________________________

A Macro To Restart The Computer :

You will just have to say "Nuke It!" and the computer will restart :
_________________________________________________________________________________

<speechMacros>
<command>
<listenFor>Nuke it</listenFor>
<speak>Rebooting The System.</speak>
<run command="C:\Windows\System32\shutdown.exe" params="-r -t 00"/>
</command>
</speechMacros>
_________________________________________________________________________________

Another One To Shut Down The Computer :

You will have to say "Goodbye Jarvis" And the Pc Will Shut Down
_________________________________________________________________________________

<speechMacros>
<command>
<listenFor>GoodBye Jarvis !</listenFor>
<speak>Getting Offline,Bye Sir</speak>
<run command="C:\Windows\System32\shutdown.exe" params="-s -t 00"/>
</command>
</speechMacros>
_________________________________________________________________________________

Download This Pretty Little App And Extract It To C:\NIR\ and you will add more intelligence to your PC :

Volume Up:

<speechMacros>
<command>
<listenFor>volume up</listenFor>
<run command="C:\nir\nircmd.exe" params="changesysvolume +5000"/>
<speak>Volume Up</speak>
</command>
</speechMacros>
_________________________________________________________________________________

Volume Down:

<speechMacros>
<command>
<listenFor>volume down</listenFor>
<run command="C:\nir\nircmd.exe" params="changesysvolume -5000"/>
<speak>Volume Down</speak>
</command>
</speechMacros>
_________________________________________________________________________________

Volume Medium :

<speechMacros>
<command>
<listenFor>volume medium</listenFor>
<run command="C:\nir\nircmd.exe" params="setsysvolume 30000"/>
<speak>Volume at medium listening level</speak>
</command>
</speechMacros>
_________________________________________________________________________________

For More Interactivity, install Voice Search on Google chrome or some similar app in firefox !

Step Three : Pimping The Interface : 5 Minutes :

So well we have completed the talking and replying part, but we don't need the old crappy windows desktop, we need a kick ass interactive desktop so our computer looks like jarvis, to do that we will install this theme from Devianart.

http://hell999.deviantart.com/art/IronMan-Jarvis-Theme-Download-259211144

After that we will need to pimp up the start of windows, to do that we will download this little utility called Bootchanger

http://hell999.deviantart.com/art/IronMan-Jarvis-Theme-Download-259211144

and getting a boot screen animation of your choice form here

http://windows7bootscreens.com/

then you are done.

Monday 20 May 2013

Photoshop Secret Shotcuts


It is proven that by using software shortcuts can boost up productivity. Here are 30 secret Photoshop shortcuts that I’ve learned from years of experience. Well, what I mean by “secret” is that these shortcuts are not documented in the menus. Keep reading and you will find how these shortcuts can speed up your productivity. I bet you don’t know all of them.
Note: this article is written in Mac Photoshop format. If you are using PC, Cmd = Ctrl and Opt = Alt.
  1. Drag selection
    With the Marquee tool, drag on the document (do not release the mouse yet), now hold down Spacebar, it will let you drag the undefined selection.screenshot
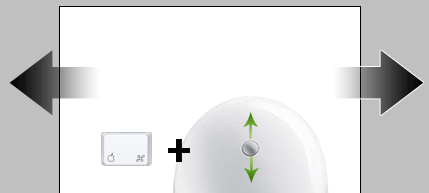
  2. Navigate the document left or right
    Hold down the Cmd key and scroll up or down allows you to navigate the document left or right. For example, hold down Cmd + scroll up will navigate to right.screenshot
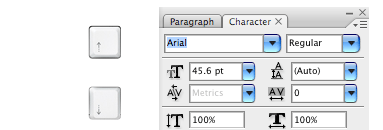
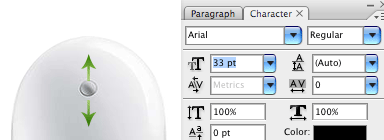
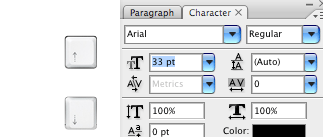
  3. Browse the font list
    Put your cursor in the font list dropdown, you can browse the font list by pressing arrow Up or Down key.screenshot
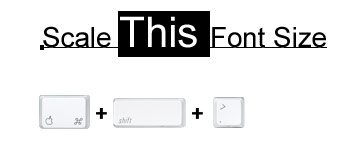
  4. Scale font size
    Select the text that you want to scale the font size, press Cmd + Shift + > or < to increase / decrease font size.screenshot
  5. Zoom with the scroll wheel
    You can zoom in / out by Cmd + Opt + scroll up or down.screenshot
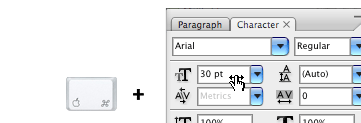
  6. Drag to adjust numberic value
    Mouseover the input box, hold down Cmd + drag left or right to increase / decrease. Hold down Cmd + Opt or Shift key and drag can change the value in decimal or 10 interval. This shortcut works in all dialog palettes.screenshot
  7. Scroll to adjust numeric value
    Put the cursor in the input box, scroll up or down to increase / decrease value. This shortcut works in all dialog palettes.screenshot
  8. Arrow up / down to adjust numeric value
    Put the cursor in the input box, press arrow Up or Down to increase / decrease. Hold down Shift and press arrow Up or Down will change value in 10 interval.screenshot
  9. Zoom to 100%
    Double click on the Zoom tool will zoom document to 100%.screenshot
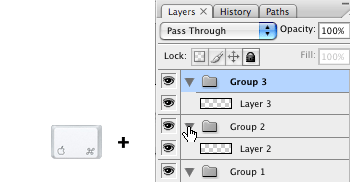
  10. Collapse or expand all layer groups
    You can collapse or expand all root-level layer groups by holding down Cmd + click on the triangle icon. Hold down Cmd + Opt + click on the triangle icon will collapse or expand all level layer groups.screenshot
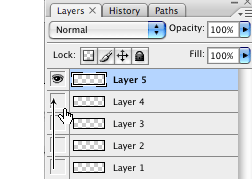
  11. Show / hide in a row
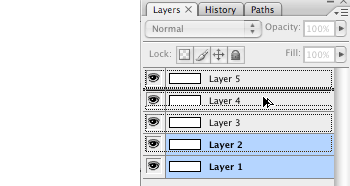
    If you need to show / hide more than one layers, instead of clicking one by one, you can click on the visibility icon and drag in a row.screenshot
  12. Hide other layers
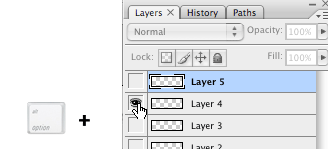
    Hold down Opt + click on the visibility icon will hide all other layers.screenshot
  13. Navigate layer blending mode
    Opt + Shift + “-” or “+” key allows you to navigate through the blending mode dropdown.screenshot
  14. Set specific blending mode
    Opt + Shift + C, N, M, S, D… allows to set layer to specific blending mode.
    For examples:
    Normal = Opt + Shift + N
    Screen = Opt + Shift + S
    Multiply = Opt + Shift + M
    Color = Opt + Shift + Cscreenshot
  15. Lock layer transparency
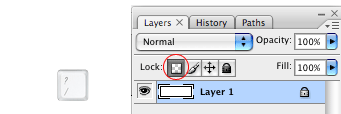
    Press forward slash (“/”) to lock layer transparency.screenshot
  16. Load Channel selection
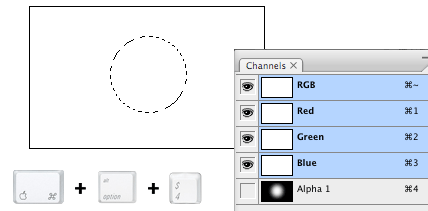
    You probably know that Cmd + number keys (1, 2, 3) will activate the channels in sequent. Press Cmd + Opt + number keys will load the selection. For example, press Cmd + Opt + 4 will load Alpha channel 1.screenshot
  17. Tool panels
    Press Tab to toggle tool panels.screenshot
  18. Precise cursor
    Caps lock will display tool cursor in precise mode.screenshot
  19. Navigate the tool list
    You can navigate through the tool list by pressing Shift + tool shorcut. For example: B = Brush tool, if you press Shift + B again, you will switch to Pencil tool.screenshot
  20. Increase / decrease brush size
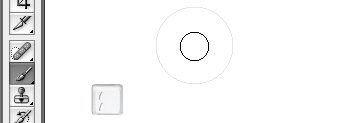
    With the Brush tool selected, you can increase / decrease the brush size by pressing [ or ] key (square bracket key). Press Shift + [ or ] will increase / decrease brush hardness.screenshot
  21. Opacity
    You can set the layer opacity by pressing the number keys (ie. 1 = 10%, 2 = 20%…). When you have the brush tool selected, pressing the number keys will adjust the brush opacity.screenshot
  22. Duplicate layer
    There are several shortcuts to duplicate layers.
    1. You can hold down Cmd + Opt + drag to duplicate the active layer.
    2. Cmd + Opt + arrow keys (Up, Down, Left, Right).
    3. Cmd + J will duplicate the active layer in exact position.
    4. Hold down Opt + drag within the Layers palette can also duplicate layers.screenshot
  23. Copy visible and paste in a new layer
    Press Cmd + Opt + Shift + E will copy the visible layers and paste in a new layer.screenshot
  24. Change workspace background
    By default Photoshop use grey for the workspace background color. You can change that by:
    1. select your favorite color
    2. choose the Paint Bucket tool
    3. Hold down Shift + click on the working area (outside the document area)screenshot
    Update: right-click on the workspace area to get a dropdown menu – allows you to set the background to black, grey, or a custom color (commented by Todd Patrick).
  25. Fill background or foreground color
    Opt + Delete (Backspace) = fill the layer with foreground color.
    Cmd + Delete (Backspace) = fill the layer with background colorscreenshot
    Update:
    Cmd + Shift + Delete (Backspace) = Fill non-transparent pixels with background color Opt + Shift + Delete (Backspace) = Fill non-transparent pixels with foreground color
    (commented by André Dion)
  26. Switch between document windows
    Ctrl + Tab will switch between document windows.screenshot
  27. Load layer transparent
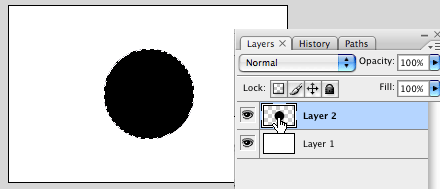
    Cmd + click on the layer thumbnail will load its transparency.screenshot
  28. Scale proportionally from center
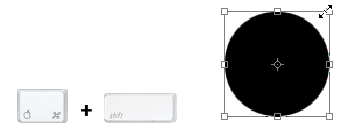
    When you are using the Marquee tools or Free Transform, hold down Opt + Shift + drag will scale proportionally from the center.screenshot
  29. Shortcut to Eyedropper
    If you have the Brush tool selected, hold down Opt key will quickly activate the Eyedropper tool. Hold down Opt + Shift will activate the Color Sampler Tool.screenshot
  30. Finally…
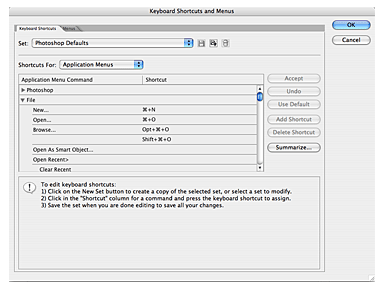
    Finally, if you want to check or set your own custom shortcuts, press Cmd + Opt + Shift + K will bring up the Keyboard Shortcuts panel.screenshot

Friday 10 May 2013

How to Hide a Drive in windows 7 or Vista


If we have more than one partition on our hard drive, we always try to keep our valuable files and folders into other drives. Sometimes it is for safety purpose or we need our personal files and folders in a different place so just anybody can’t able to access those easily. So we wish to hide those files and folders from others. We can create a separate partition on our hard drive, keep all our personal files there and hide that whole partition. So anybody access your computer, can’t able to open or see that extra partition. I know many of us want this to apply into their computer. It is very easy, for your guidance I am attaching some screenshots also with my write up.
Here you can see my explorer window through My Computer.
Explorer
Now if I want to hide my Drive D then I need to follow these steps;
Start Menu
Click on Start Menu and type regedit in search box
Open regedit and go to HKEY_CURRENT_USER\Software\Microsoft\Windows\CurrentVersion\Policies\Explorer
Regedit
Inside explorer box right click on your mouse and click New > New DWard Value. Choose 32 bit.
Rename it to NoDrive
Regedit
Right click on it and select Modify. Change the Base from Hexadecimal to Decimal and put 8 as the value data for Drive D.
Regedit
For me this value is 8 because I am going to hide Drive D. If you want to hide some other drive please follow this chart below.
Table
If you want to hide two or three drives then just add those values. For example if you want to hide drive D and F then just add both the values (D=8, F=32) 8 + 32 = 40
Now close the regedit program and close all open programs. Restart your computer and you will see that Drive D is gone. If you want to revert back your hidden drive just go inside regedit into same path and delete that Nodrive value.
You can ask me that if you want to access anything into that hidden drive, everytime you need to open regedit and delete NoDrive and restart, then my answer will ne be NO. You just make that drive hidden not deleted.
Explorer
Open your explorer and type D: on the path, press enter, you can access all your files and folders. In another way you can click on start menu and type D: on the search box and press enter, it will also give you the same result.

How to Make a CAT5 Network (Ethernet) Cable

Ethernet cables or LAN cables have a major role in Networking. These cables are commonly used for creating a network between computers or switches. These cables are also known as category 5 or CAT 5 cables in short. Here are the steps below for general CAT 5 cable construction guidelines. Mainly two types of CAT 5 cables are used for Network, 1) Straight and 2) Cross-Over. Creating a network between two Computers, laptops or Switches we need Cross-Over CAT 5 cables and when we need to connect between a Switch and a Computer or laptop we use straight CAT 5 cables.
Here we can see how to create a straight CAT 5 cable as an example.
At first we need to check the length of the cable. Once we are satisfied with the length then we can start to punch both the sides. Now carefully remove the outer jacket of the cable. We should be very careful when stripping the jacket as to not nick or cut the internal wiring. We can use crimping tool for that. This reduces the risk of nicking the wires’ insulation. You will notice 8 colored wires twisted in 4 pairs. Each pair will have one wire of a certain color and another wire that is white with a colored stripe matching its partner (this wire is called a tracer).
Check all the wires carefully for any cuts or scrapes that expose the copper wire inside. If you have cut the jacket of any wire, you will need to cut the entire segment of wires off and start again, otherwise it will lead to poor performance or no connectivity at all. It is very much important that the jacket for all network cables remains intact. Now untwist all the pairs and make them flat and straight as much as possible. Arrange the wires based on the Straight wiring specifications.
Put the wires in the following order, from left to right:
Ethernet cable
For Straight cable
White Orange, Orange
White Green, Blue
White Blue, Green
White Brown, Brown
And for Cross-Over cable
White Green, Green
White Orange, Blue
White Blue, Orange
White Brown, Brown
Make all the wires straight and parallel between your thumb and forefinger. Check the colors have remained in the correct order. Cut the top of the wires very neatly and carefully. If they are not properly cut it may cause the wire not working or poor connectivity.
RJ-45 connectorNow push the wires carefully into the RJ-45 plug with the flat surface of the plug on top. Check the orders of those wires while pushing. Push all the wires so they touch the top of the RJ-45 plug connector very well. The cabling jacket should also enter the rear of the jack to help secure the cable once the plug is crimped. Verify that the sequence of the wires once again before crimping. Place the wired plug into the crimping tool, press it. You should hear a noise as you continue pressing. Once you have completed the crimp, release the handle and take out the wire.
Repeat all of the above steps in the same order to the other end of the cable. We are creating a Straight cable so here the pair should be in the same order. In case we want to create a Cross-Overcable then follows the Cross-Over paring order.
Now you can test your newly created Straight cable to ensure that it is working fine. Wrongly wired or incomplete network cables could lead to us headaches. For testing your cables easily and quickly you can buy a simple cable tester. It simply tests connectivity pin to pin.